Saturday, October 26, 2013

Diy Rapunzel Costume


  So, when the movie Tangled first came out my friends would mess with me and call me Rapunzel. You know that scene where she hits Flynn, or Eugine, with a frying pan? Yep, apparently that is something I would do. My blonde and longish hair just helped their point. Hey, I'm not complaining though. If they would like to call me a princess I am perfectly fine with that. 
(Cute little curtsy)
   That being said, during Homecoming week this year we had character day. I thought I would attempt to be Rapunzel since I "look like her". It turned out to be a lot easier than I thought.

  
  I wore a purple knee length dress, a pink half jacket, and a white slip. Simple right? Yes! Since I had to wear shoes I wore simple gold sandals. I tried to avoid bringing attention to my feet since Rapunzel does not wear any shoes.

  For my hair I simply french braided it then found all of the flower clips I owned and clipped them in.

  For fun I used my brothers green lizard toy to be Pascal.


  An optional alternative to the dress and jacket would be this:
A purple short sleeved shirt over a pink long-sleeved shirt paired with a purple skirt.

Optional things to add to this costume would be gold jewelry, a frying pan (yes, seriously), and a green lizard. 


  Enjoy putting together your DIY Rapunzel costume, I know I did! Remember, the main colors are pink and purple with gold accents. These are just two ways you can put together this costume. I'm sure you can come up with some creative ways too! If you happen to post about how you made your DIY Rapunzel costume I would love to read about it in the comments below.


Pin It

Tuesday, October 22, 2013

Personalized Shoes

So, I've noticed that recently people have been obsessed with personalized things, from water bottle wrappers to purses. 
I love things that are personalized, it means no one else will have anything like it! 
Something I have personalized is shoes.
There are several ways you can personalize your own shoes but I personally found this way to be really fun. I went to Walmart and got just plain white canvas shoes and puffy paint. That's it! It was about $15 all together.
Now, I don't suggest just going to town with the puffy paint, but if you want to then by all means do. I drew what I wanted with pencil first and then put the puffy paint on them. Remember, make things the way you want them, they don't have to be perfect. I think that the little quirky things are what adds character.
It was really fun to come up with my own design for shoes, here's what they ended up looking like!


If you decide to personalize your own shoes please leave the link in the comments below!

Pin It

Thursday, January 24, 2013

{52 Weeks} Car Trip Visor Clips - Week 3


So, my family takes tons of road trips. And there's seven of us. Five kids. It's super fun! On our recent trip, mom and I decided to take the chance to try these awesome visor clips.

What pin: this awesome pin
Who found it: Both of us :) 

Here's how you do it...

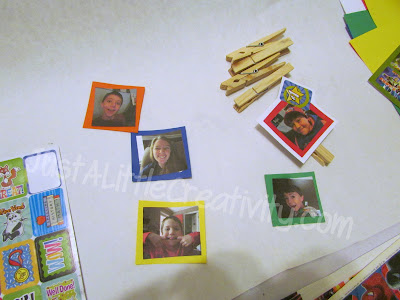
Supplies- Photos of the kids clothes pins colored paper stickers white glue hot glue scissors


First, we cut out the photos, and glued them with white glue to the colored paper, then added a sticker for decoration.


Next, we hot glued the photos to the clothes pins. Make sure you glue them facing the correct direction so you can see the faces when they're clipped to the visor.


Now, to make these most effective, I threw a little incentive behind them. Instead of only a punishment should their clips be taken down for poor behavior, I set a timer on my phone, and ever two hours, if their clips stayed up, they earned a dollar. This dollar they were able to save or spend at our pit stops. Most the kids kids saved their dollars.


I had so much fun doing this project and it worked so well! Let us know how you like it by commenting below.
For more info about this pin challenge, and to join in, make sure you check out the full post about it HERE.


Pin It

Monday, January 14, 2013

{52 Weeks} Healthy Chick-Fil-A Nuggets!

I don't know about you but I LOVE Chick-Fil-A! Especially the nuggets and sauce? Am I right? So for my moms and I second 52 week Pinterest Challenge we found a copy-cat recipe for Chick-Fil-A nuggets and sauce.

Who found it? Mom!
What pin? This one from Iowa Girl Eats!

Here it is! The beautiful recipe!
How did we make it healthier? We simply baked them instead of frying them.

Baked Chick-fil-A Nuggets serves 6  WW points+ 5
Ingredients- 3 large boneless skinless chicken breasts, thawed
3/4 cup milk
1/4 cup pickle juice
1 egg
1-1/4 cups flour
2 Tablespoons powdered sugar
2 teaspoons salt
1 teaspoon pepper

Directions- Cut chicken into nugget sized pieces, and season with salt and pepper. Mix milk, pickle, juice, and egg and pour into ziplock bag, along with the chicken. Let marinate in the fridge for a minimum of 2 hours. Preheat to 425 Next, add flour, powdered sugar, salt, and pepper in a separate ziplock bag.  Place marinated chicken into bag, and shake well to fully cover. Spray a baking sheet with olive oil, and lay out nuggets. Lightly spray olive oil once again over the nuggets, and bake for 8-10 minutes. Flip over nuggets and continue to bake for an additional 5-7 minutes. 


For the sauce, we used THIS Pin, the original recipe comes from Iowa Girl Eats, and you can find it HERE.
I also tweeked this one just a bit to adjust to the ingredients I had on hand, so here you have it-
Chick Fil-A Sauce serves 6 WW points+ 3
Ingredients- 1/2 cup Mayo 1 1/2 tsp prepared mustard
1 tsp lemon juice
1 1/2 tbs honey
1 tbs honey BBQ sauce

Directions-
Stir all ingredients together, serve with nuggets.


What I thought about it?
I enjoyed working on this with my mom and her teaching me how to cook. We had fun mixing the recipe and just simply making it.

I really loved the way they tasted... I might have even stole some of my brothers. 

Let us know how yours turned out!


Pin It

Saturday, January 12, 2013

FREE Valentines Day Card Images!


So, we all know that Valentines day (or Singles Awareness day) just around the corner.My Valentines day consists of a game at school to where you can't talk to a guy or they "get your heart" (it's an actual heart necklace. Don't worry, were not turning into Cora from Once Upon a Time) and I nice dinner with my parents! We really have fun though, I'm not being sarcastic (surprisingly).

Anyway, I decided to make these Valentines day cards for you all to use! You can just copy and paste them from here. If you use them, let me know how you liked them and how they turned out!

For the best sturdiness I would print them on cardstock or scrap-book paper.


Pin It

Sunday, January 6, 2013

{52 Weeks} #1 Mod-Podge Flower Pot Collage #pinchallenge

It's here! The first project of our 52 week Mother, Daughter pinterest challenge

#PinChallenge

To start the year and our challenge off we decided to make a goal collage. Instead of just putting our collage on a canvas we put it on a flower pot. Something more representative. As the flower grows into something new each day we can be reminded of our goals progressing each day. Makes sense, right?

Who chose the challenge? Me!
Inspired by? This pin from the Goal Poster by Oh So Pretty the Diaries 


What we used-
Terra cotta clay pot
White primer (Any color will do)
Magazines to cut out words and pictures.
Matte Mod-Podge
Acrylic sealer 

Steps-
1. Find inexpensive terra cotta clay pots
2. Prime the pots the color of your choice
3. Cut out the pieces for your collage (This was my favorite part)
4. Apply your collage pieces with Mod-Podge
   - If you apply the Mod-Podge to the pieces rather than the flower pot it goes on better
5. Cover your final collage product with a layer of Mod-Podge
6. Plant your flowers! 


** Make sure you seal the Mod Podge with some sort of acrylic sealer, or it may get wet and messed up when you water your plant **

I really enjoyed doing this project with my mom. We laughed a lot and I enjoyed seeing what she wanted to do this year. We both had Europe on your flower pots, just saying.
We did have a special guest who joined us. My best friend who was visiting home for Christmas break. We all had a blast!

You can check out my mom's post and thoughts about this project as well over at Just a Little Creativity.

If you do join us in our 52 week Mother, Daughter Pinterest challenge, write #pinchallenge on your post. By hash tagging we can find your project on Instagram and Twitter. Also, if you pin a picture from this challenge write #pinchallenge somewhere in the description so we can find it on Pinterest to.


Pin It

Wednesday, January 2, 2013

52 Weeks Mother, Daughter Pinterest Challenge #pinchallenge

Happy new year everyone! 

This year my mom, who blogs at Just A Little Creativity, and I decided to challenge our creativeness. We are going to do one Pinterest inspired project a week. I choose one, then mom chooses one, then we choose two together. The project can be anything; crafts, hair styles, nail designs, recipes, books to read, etc. What's going to make it interesting (Besides the fact that most Pinterest projects don't turn out the way they look)? We can not say "No." to whatever project we pick. 

Now, I made a comment last night that we shouldn't be allowed to make the other person dye their hair. What did mom say? "Well, we can't say no." With that motherly grin where you can hear the Mufasa laugh. My response? "If I have to dye my hair, your ding yours purple." 

Needless to say, there may be some "payback projects". 

I'm looking forward to having this extra time to spend with my mom. I know our weeks will be full of laughs, and probably a little frustration when we can't figure out how to do something. There may also be special crafty guests such as my brothers, my grandmother, and some friends of ours. We can't wait to begin!

If you want to join us you certainly can! It doesn't necessarily have to be a Mother and Daughter group, it can be sisters, brothers, friends, or just yourself! 

We made this special button for this challenge. If you participate please feel free to place this button on your blog and you can even share the link to your projects in the comments below.
When posting, be sure to use the special hashtag #pinchallenge so we can easily find everyones projects! 


Pin It